Using Chat Services
This is a tutorial for connecting your trained ParlAI agents to various chat services in order to allow your models to talk to humans. Humans using chat services (like Facebook Messenger) can be viewed as another type of agent in ParlAI and communicate in the standard observation/act dict format.
We currently support the following chat services:
Browser
Facebook Messenger
Terminal
Web Sockets
You can find more information on how to set up these services below.
:::{note} If you’d like to use a service outside of the 4 listed above, please read here for information on how to set up a new chat service. :::
Overview
As stated, humans messaging on chat services can be viewed as a type of agent in ParlAI, communicating with models via observations and action dicts. Human agents, which are ChatServiceAgents are placed in worlds with ParlAI agent(s) and possibly other humans, and the world defines how each of these agents interacts.
The chat environment is defined by the task. A task typically consists of an Overworld, which can spawn subtasks (subworlds) or serve as a “main menu”, allowing people to pick from multiple conversation options. The task definition resides in a config file, config.yml, which contains all available worlds and any additional commandline arguments.
Here is an example config file for a Messenger chatbot:
tasks:
  default:
    onboard_world: MessengerBotChatOnboardWorld
    task_world: MessengerBotChatTaskWorld
    timeout: 1800
    agents_required: 1
task_name: chatbot
world_module: parlai.chat_service.tasks.chatbot.worlds
overworld: MessengerOverworld
max_workers: 30
opt:  # Additional model opts go here
  debug: True
  models:
    blender_90M:
      model: transformer/generator
      model_file: zoo:blender/blender_90M/model
      interactive_mode: True
      no_cuda: True
additional_args:
  page_id: 1 # configure your own page
Let’s walk through each of these keys:
tasks- thetaskskey defines the options that are presented to a user upon entering anOverworld. In this case, there is only onetaskdefined:default. Thedefaultkey specifies the following subkeys:onboard_world- the world used for agent onboardingtask_world- the world that defines that logic for handling users in the main tasktimeout- the timeout for human responses in the worldagents_required- how many human agents are required to run this world. Specify > 1 if you’d like more than one human to interact.
task_name- the name of your task. not super important to define, but good to have nonethelessworld_module- this is a module path to the module in which all of the task worlds are defined. If you have worlds in separate files, simply importing them into this file will suffice.overworld- The name of the overworld class.max_workers- How many max human connections you plan on supporting for your serviceopt- any task-specific options you need to define.models- Perhaps the most important key in this config. This is where you define the models that you’ll be using. Each entry under this is a mapping from custom model name to model params. So, in this example, we have defined a modelblender_90Mthat we would like to access in their task. For this model, we then specify the actual model arguments necessary to create a ParlAI agent.
additional_args- These are for any specific service-specific args you might want to specify - e.g. if using Facebook Messenger, you would specify your page ID here.
:::{important} ON THE SUBJECT OF MODELS
The models key defines all models you’d like to load in your service - the respective chat service managers load models according to these parameters, and then put a shared copy of the agent in opt['shared_bot_params'][model_key]. The following snippet is copied from the MessengerBotChatTaskWorld:
from parlai.core.agents import create_agent_from_shared
from parlai.core.worlds import World

class MessengerBotChatTaskWorld(World):
    """
    Example one person world that talks to a provided agent (bot).
    """

    MAX_AGENTS = 1
    MODEL_KEY = 'blender_90M'

    def __init__(self, opt, agent, bot):
        self.agent = agent
        self.episodeDone = False
        self.model = bot
        self.first_time = True

    @staticmethod
    def generate_world(opt, agents):
        copy_of_model = create_agent_from_shared(
            opt['shared_bot_params'][MessengerBotChatTaskWorld.MODEL_KEY]
        )
        return MessengerBotChatTaskWorld(opt, agents[0], copy_of_model)
:::
After following the set-up instructions (detailed below) and filling in your own page id, this task could be run with the following command from the parlai/chat_service/services/messenger directory:
python run.py --config-path ../../tasks/chatbot/config.yml
Example Tasks
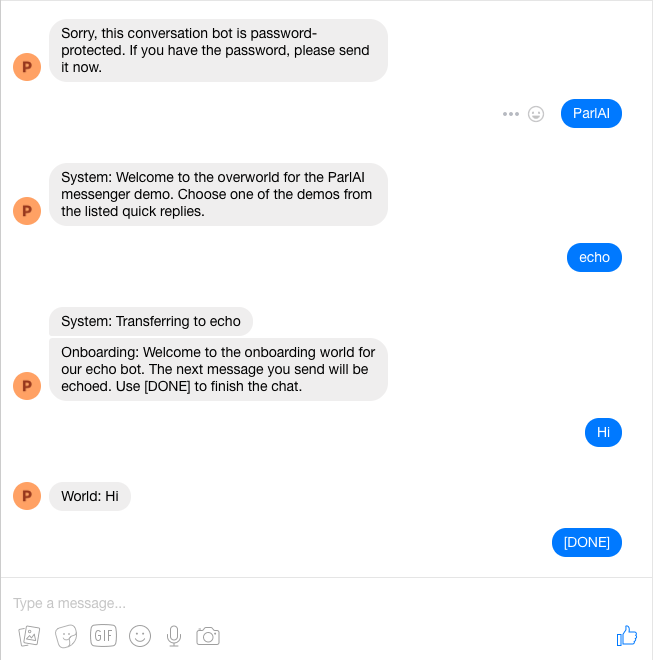
As an example, the Overworld Demo displays three separate tasks connected together by an overworld.
The
echotask is a simple example of an echo bot, and shows the functionality and flow of a simple single-person world.The
onboard datatask is an example that shows how an onboarding world can collect information that is later exposed in the active task world.The
chattask is an example of a task that requires multiple users, and shows how many people can be connected together in an instance of a world and then returned to the overworld upon completion of a task.
In addition to the overworld demo, the following example tasks are provided:
Generic Chatbot: Allow conversations with any ParlAI models, for instance the PersonaChat model.
QA Data Collection: collect questions and answers from people, given a random Wikipedia paragraph from SQuAD.
Creating your Own Task
To create your own task, start with reading the tutorials on the provided examples, and then copy and modify the example worlds.py and config.yml files to create your task.
A few things to keep in mind:
A conversation ends when a call between
parleycalls toepisode_donereturns True.Tasks with an overworld should return the name of the world that they want to queue a user into from the
parleycall in which the user makes that selection to enter a world.To collect the conversation, data should be collected during every
parleyand saved during theworld.shutdowncall. You must inform the user of the fact that the data is being collected as well as your intended use.Finally, if you wish to use and command line arguments as you would in ParlAI, specify those in the
optsection of the config file.
Available Chat Services
Browser
This allows you to participate in a ParlAI world as an agent using a local browser.
This extends the websocket chat service implementation to run a server locally,
which you can send and receive messages using a browser.
Setup
Run:
python parlai/chat_service/services/browser_chat/run.py --config-path path/to/config.yml --port PORT_NUMBERRun:
python client.py --port PORT_NUMBERInteract
Example command: python parlai/chat_service/services/browser_chat/run.py --config-path parlai/chat_service/tasks/chatbot/config.yml --port 10001
If no port number is specified in --port then the default port used will be 34596. If specifying, ensure both port numbers match on client and server side.
Facebook Messenger
This allows you to chat with a ParlAI model on Facebook Messenger.
Setup
ParlAI’s Messenger functionality requires a free heroku account which can be obtained here. Running any ParlAI Messenger operation will walk you through linking the two.
Running and testing a bot on the Facebook Messenger Platform for yourself will require following the guide to set up a Facebook App for Messenger. Skip the set up your webhook step, as ParlAI will do it for you.
When the guide asks you to configure your webhook URL, you’re ready to run the task. This can be done by running the
run.pyfile in with python.After the heroku server is setup, the script will print out your webhook URL to the console, this should be used to continue the tutorial. The default verify token is
Messenger4ParlAI. This URL should be added in the Webhook section. The webhook subscription fields should also be edited to subscribe to themessagesfield.On the first run, the page will ask you for a “Page Access Token,” which is also referred to on the messenger setup page. Paste this in to finish the setup. You should now be able to communicate with your ParlAI world by messaging your page.
To open up your bot for the world to use, you’ll need to submit your bot for approval from the Developer Dashboard.
Note: When running a new task from a different directory, the webhook url will change. You will need to update this in the developer console from the webhook settings using “edit subscription.” Your Page Access token should not need to be changed unless you want to use a different page.
Additional flags can be used (you can also specify these in the config.yml file):
--password <value>requires that a user sends the message contained invalueto the bot in order to access the rest of the communications.--force-page-tokenforces the script to request a new page token from you, allowing you to switch what page you’re running your bot on.--verboseand--debugshould be used before reporting problems that arise that appear unrelated to your world, as they expose more of the internal state of the messenger manager.
Other things to keep in mind when creating your Messenger tasks:
Your world can utilize the complete set of Facebook Messenger Templates by putting the formatted data in the ‘payload’ field of the observed action.
Quick replies can be attached to any action, the
MessengerOverworldof the Overworld Demo displays this functionality.
Terminal
This allows you to participate in a ParlAI world as an agent using the terminal.
This extends the websocket chat service implementation to run a server locally,
which you can send and receive messages from using the terminal.
Setup
Run:
python parlai/chat_service/services/terminal_chat/run.py --config-path path/to/config.yml --port PORT_NUMBERRun:
python client.py --port PORT_NUMBERInteract
Example command: python parlai/chat_service/services/terminal_chat/run.py --config-path parlai/chat_service/tasks/chatbot/config.yml --port 10001
If no port number is specified in --port then the default port used will be 34596. If specifying, ensure both port numbers match on client and server side.